How to add AI product recommendations to your Shopify store in Flexsee
Use Wizard Flow to train a product_recommendations model from Shopify data, pick who gets each SKU, and activate personalized recommendations in Klaviyo, Meta, Mailchimp, or Quick Pay.
Shopify’s theme “related products” widgets only surface items that already sold together. They cannot tell you which logged-in shoppers are likely to buy a specific SKU next, or rank next-best products per customer for email. Flexsee handles both from Wizard Flow: connect Shopify, pass readiness, pick a product and destination, and Flexsee creates the recommendation model and scores your audience automatically during Targeting — no manual model training step.
This guide is the recommendations-focused path: product-scoped audiences for ads and email, per-recipient product picks for Klaviyo, and where to validate the same scores on Products and Customers before you activate.
What you’ll accomplish
- Shopify synced with catalog, orders, customers, and pixel events under Integrations → Datasources
- A Wizard Flow that passes Readiness and trains a product_recommendations model when you reach Targeting
- A chosen product-to-users segment (for example Ready to Buy) for a specific SKU
- Destination setup completed for Meta Ads, Email & SMS (Klaviyo), Mailchimp, or Quick Pay
- Optional checks on Products → Intelligence → Audience and Customers → Intelligence → Predictions
Prerequisites
Before you begin, make sure you have:
- A Shopify store with products, orders, and storefront traffic
- A Flexsee account — see How to connect Shopify and Flexsee in 10 minutes if Shopify is not connected yet
- Flexsee AI Predictions pixel enabled (Integrations → Datasources → Shopify → Enable pixel) and Always on in Shopify Admin
- At least 11 behavioral events on the store card (page views, product views, add-to-cart)
Connect your marketing destination (Meta, Klaviyo, or Mailchimp) only when you are ready for Destination setup and Activate. You do not need a model in AI Models before starting — Wizard Flow creates one during Targeting when needed.
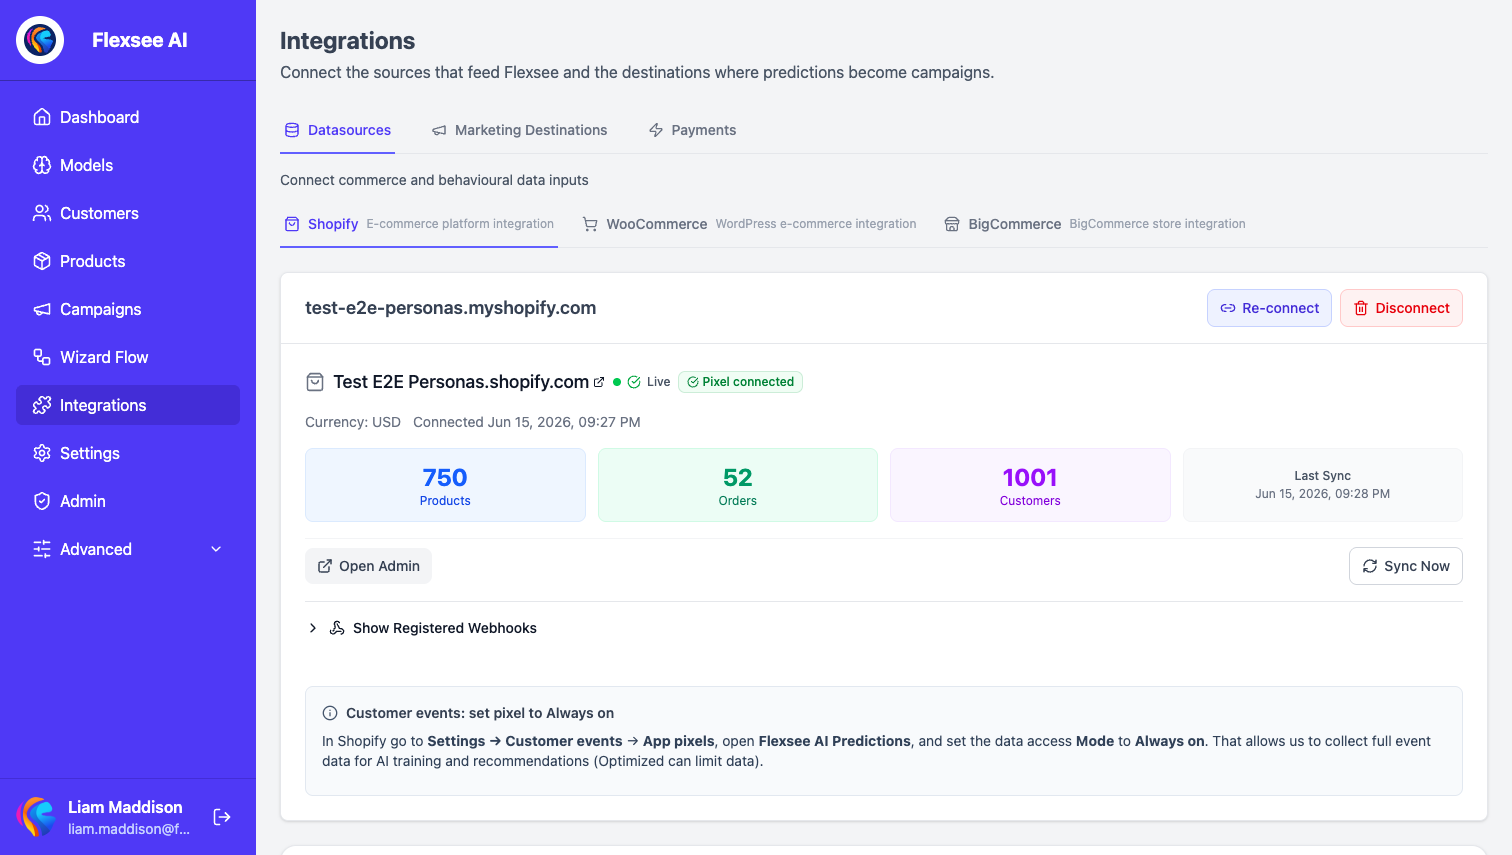
Step 1 — Connect Shopify and confirm sync
In this step, you will confirm Flexsee has the data recommendations need.
- Sign in to the Flexsee dashboard.
- Open Integrations → Datasources → Shopify (
/integrations/datasources/shopify). - Verify your store card shows Synced with non-zero Products, Orders, and Customers.
- Confirm Behavioral events (for first model) shows Ready to train (11+ events). If not, browse your live storefront while logged out.
- Leave the pixel enabled so browse and cart signals keep improving rankings after your first campaign.
Orders and pixel events together feed the product_recommendations model Flexsee creates inside Wizard Flow.
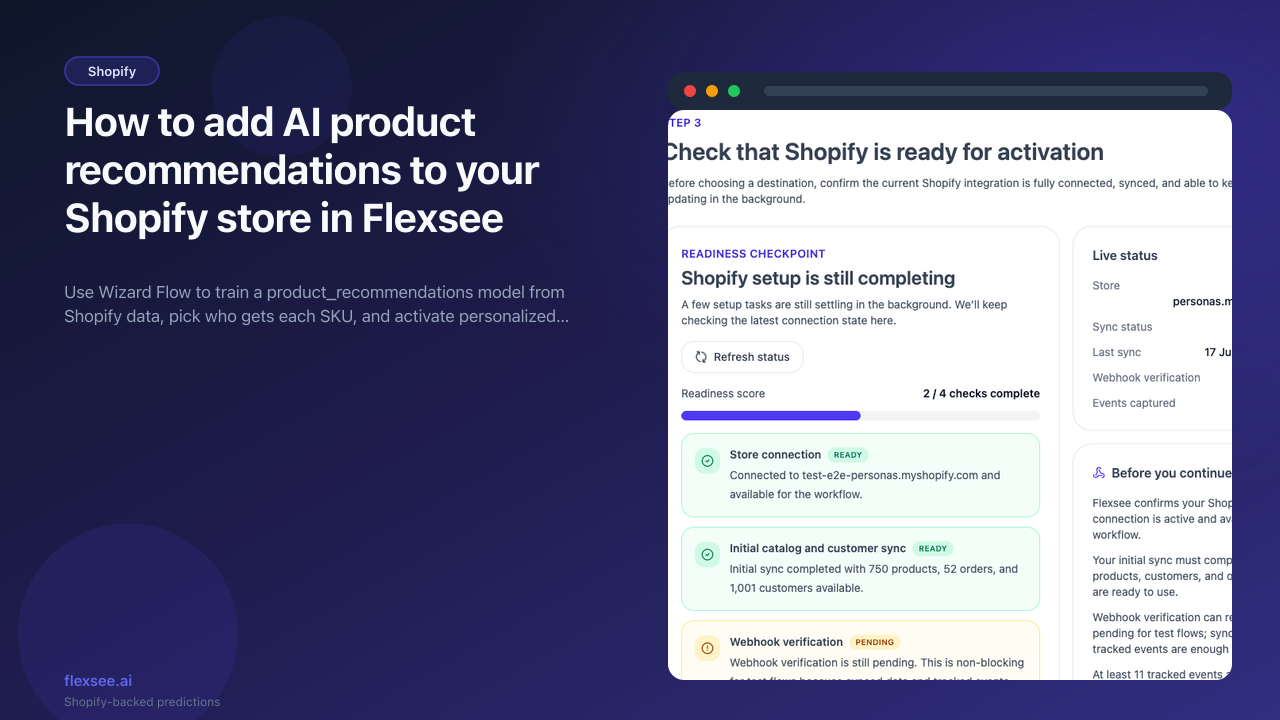
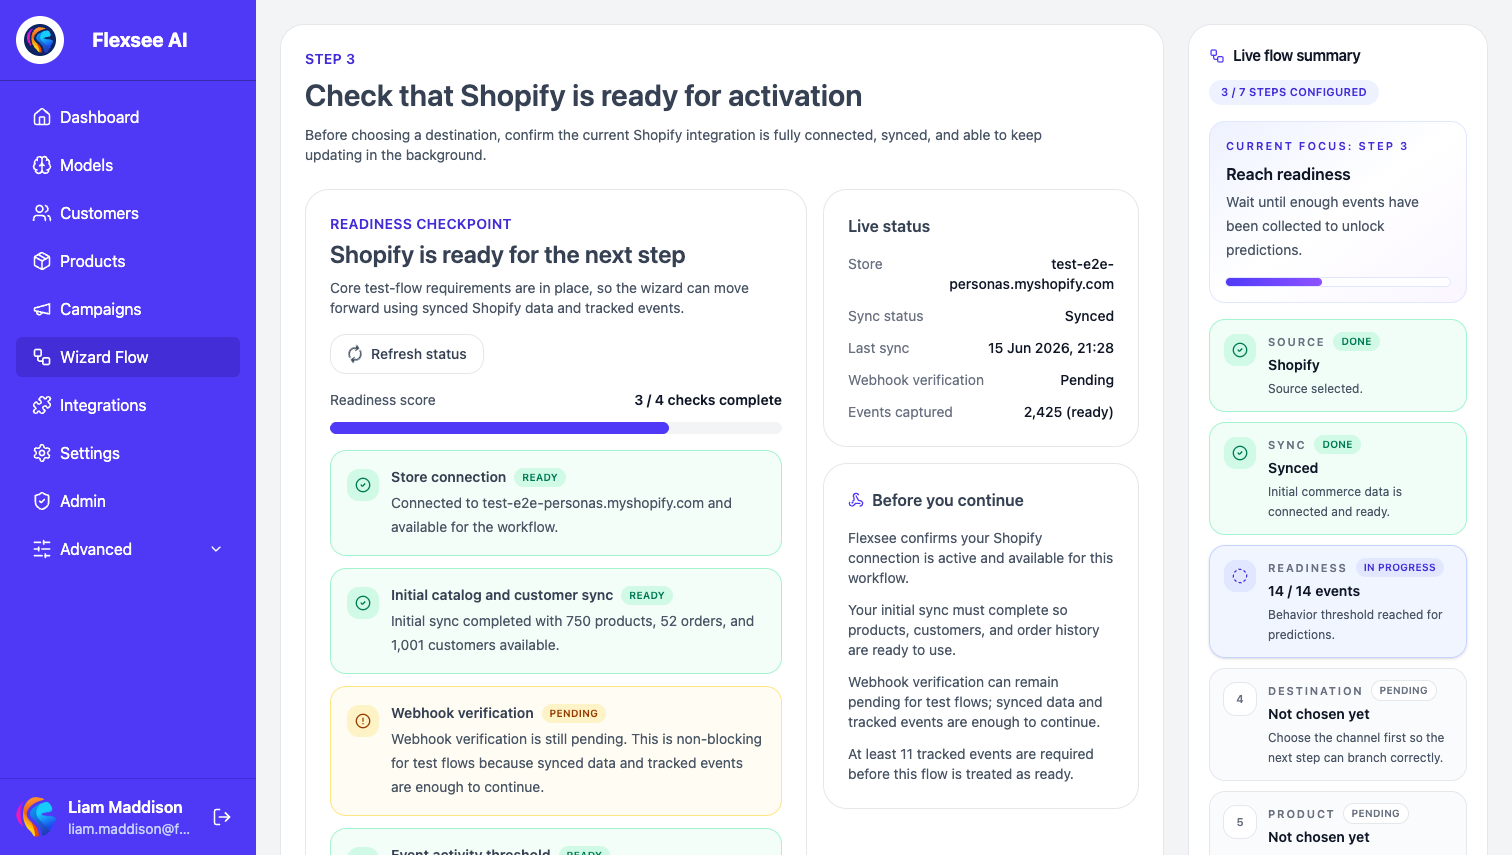
Step 2 — Start Wizard Flow and pass readiness
In this step, you will open the guided flow and confirm Shopify is ready.
- Open Wizard Flow (
/wizard-flow) and click Create flow. - On Data source, select Shopify.
- On Connect and sync, confirm your connected store and wait for the initial import if it is still running.
- On Readiness, wait until these checks pass:
- Store connection — active and not in error
- Initial catalog and customer sync — completed with product, order, and customer counts
- Webhook verification — verified or pending (pending is OK on Shopify test stores)
- Event activity threshold — 11+ events captured
- Continue to Destination when readiness shows your store is ready.
Everything from model training through activation happens inside this flow — you do not need a separate training workflow.
Step 3 — Choose where recommendations should go
In this step, you will pick the channel that matches your campaign goal.
- On Destination, select one channel:
- Email & SMS (Klaviyo) — send Flexsee Campaign Send events with per-recipient
flexsee_recommendations(see Klaviyo recommendations guide) - Meta Ads — retarget or prospect shoppers scored for a product (see Meta lookalike guide for prospecting setup)
- Mailchimp — predictive email audiences from the same product-to-users scores
- Quick Pay — one-click checkout links for high-intent shoppers on a chosen SKU
- Email & SMS (Klaviyo) — send Flexsee Campaign Send events with per-recipient
- Note which integration Flexsee expects on Destination setup (Klaviyo flow picker, Meta budget and creative, etc.).
Pick the destination before Targeting — audience scores are product-scoped, but activation wiring differs by channel.
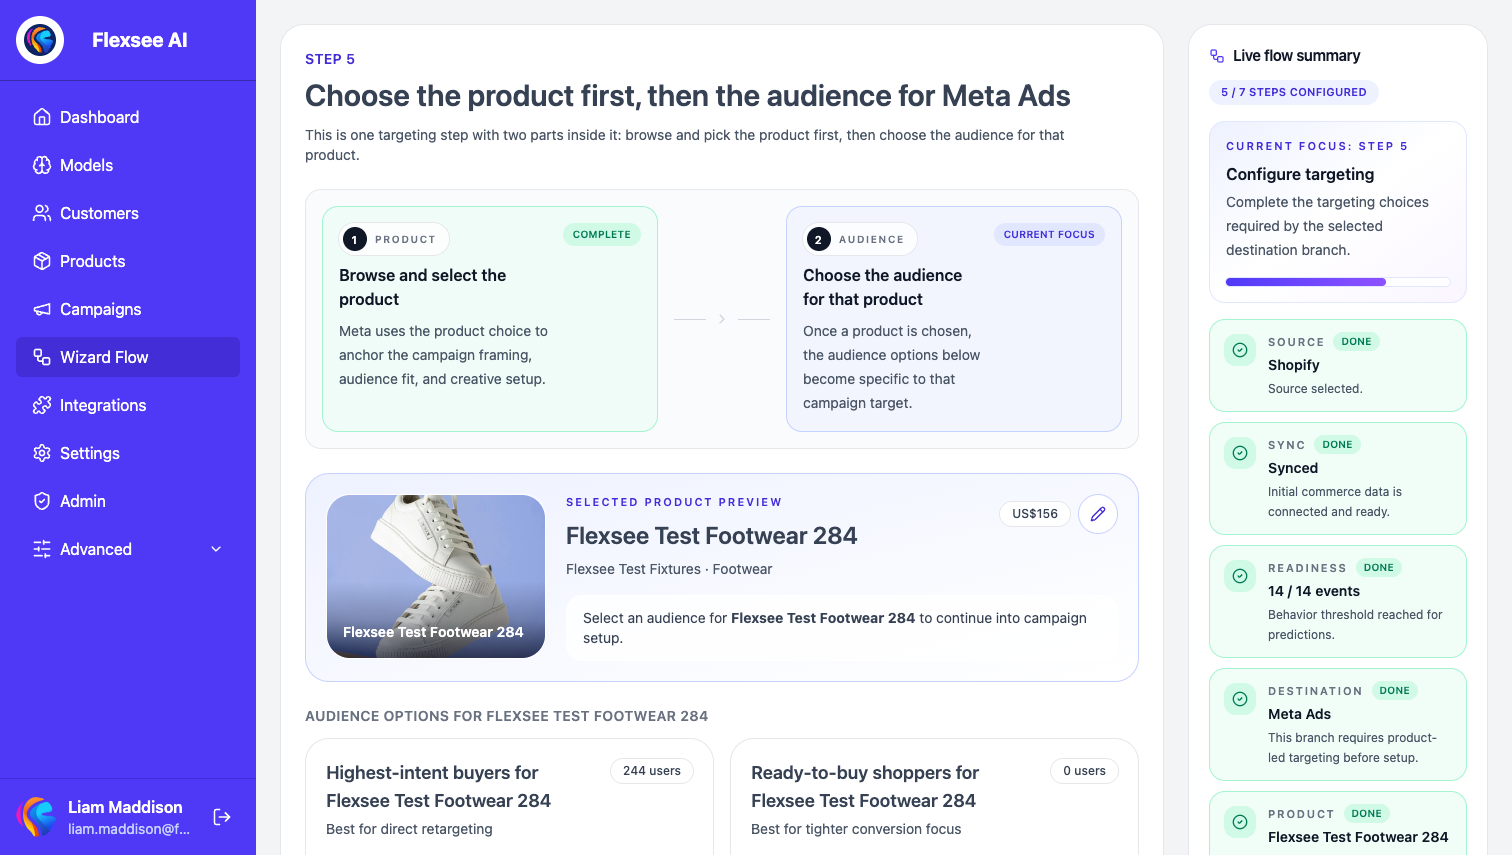
Step 4 — Pick a product and generate the recommendation audience
In this step, Flexsee trains (if needed) and ranks shoppers for your SKU.
- On Targeting, select a product from your synced Shopify catalog — this is the SKU you want to promote or retarget toward.
- Flexsee checks for an existing product_recommendations model for that store. If none exists, the step shows Creating model automatically — stay on the page until status moves to Generating audience (typically a few minutes).
- When ready, Flexsee displays product-to-users audience cards: ranked shoppers with propensity on a 0–5 scale shown as purchase percentages.
- Persona labels such as Ready to Buy, Serious Shopper, and Considering Purchase group score bands (scores ≥ 4.0 map to Ready to Buy). Choose the band that fits your campaign — tighter bands for paid spend, broader bands for email nurture.
- Toggle individual recipients if you need to exclude specific profiles before activation.
This is the core recommendation workflow: one product in, ranked shoppers out, backed by a model trained on your Shopify catalog and behavioral events.
Step 5 — Complete destination setup and activate
In this step, you will wire channel-specific settings and publish.
- Continue to Destination setup and fill in the fields for your chosen channel:
- Klaviyo — select a Flexsee Campaign Send flow, set Email subject, and Products per recipient (Flexsee ranks that many items per profile from the same model)
- Meta Ads — set objective, daily budget, creative, and audience options prepared in the wizard
- Mailchimp — configure list and campaign fields shown on the step
- Quick Pay — confirm checkout and tracking settings for the product audience
- Review the flow summary — audience size, product, destination, and model status should show Complete or attached to an in-progress train that finished on Targeting.
- Click Activate (or Send email for Klaviyo flows) when preflight checks pass.
Flexsee publishes audiences and campaigns from the wizard — you do not export CSVs to Ads Manager or manually rebuild segments in Klaviyo.
For Klaviyo template HTML and event properties, follow How to add AI product recommendations to Klaviyo.
Step 6 — Validate recommendations on Products and Customers (optional)
In this step, you can inspect the same model output outside the wizard.
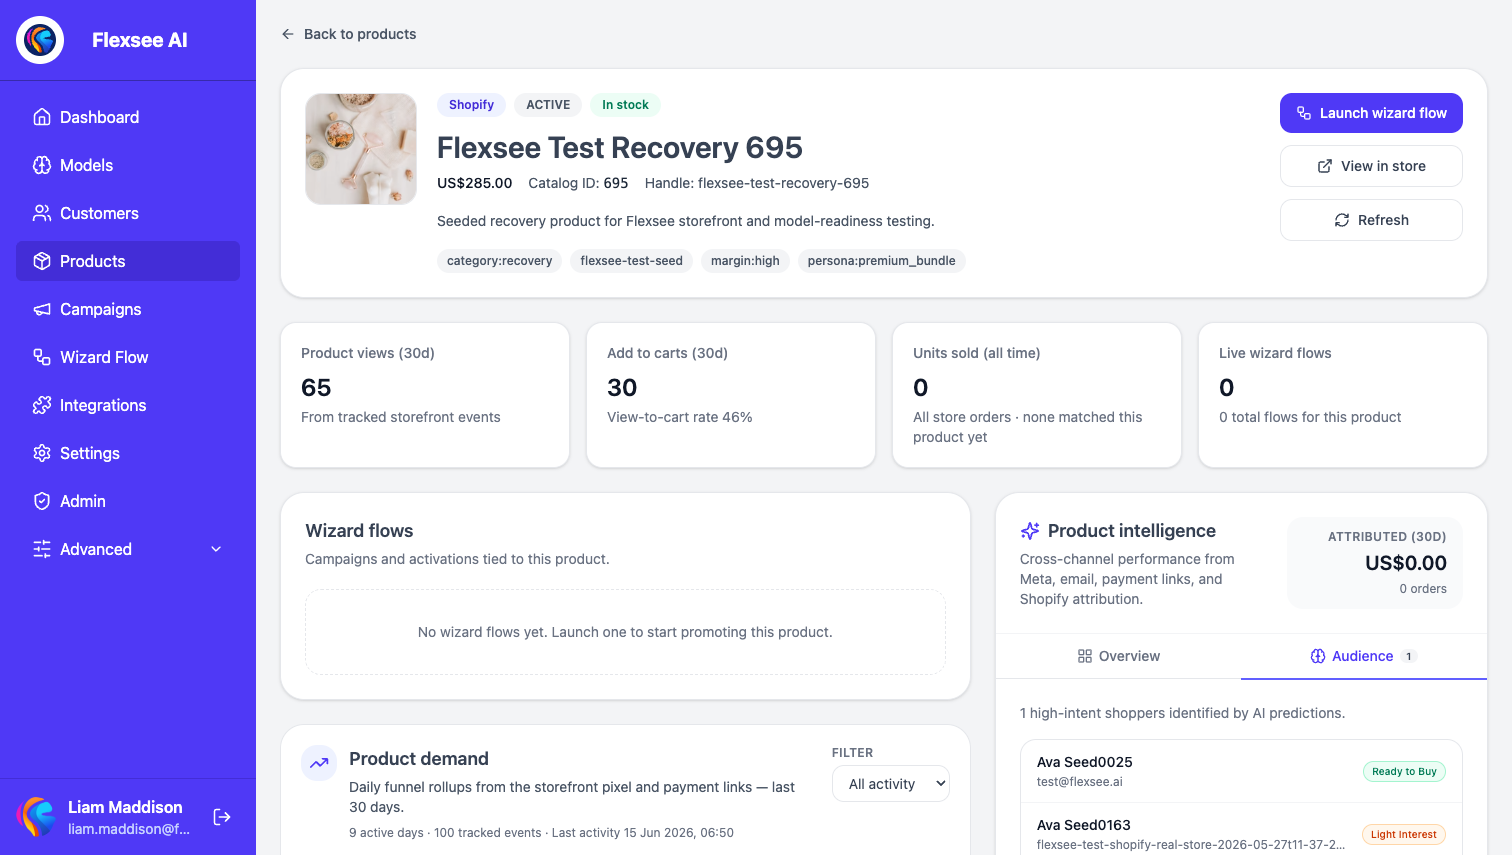
Product → users (who should buy this SKU)
- Open Products and select the product you targeted.
- In Intelligence, open the Audience tab.
- Flexsee runs the same product-to-users API as Wizard Flow — ranked shoppers with persona labels.
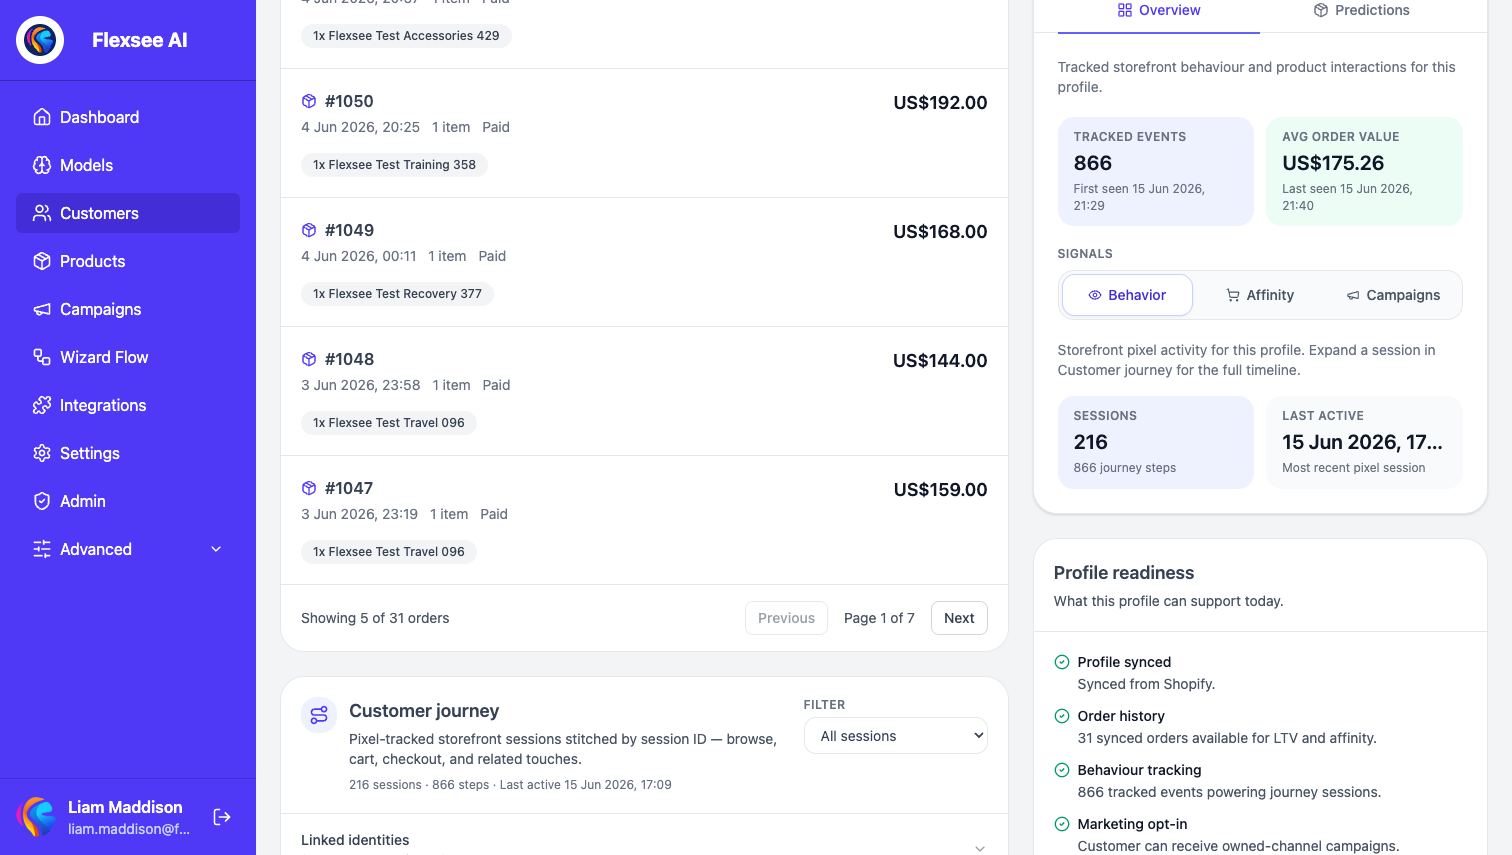
User → products (what to recommend to this shopper)
- Open Customers and select a profile.
- In Customer intelligence, open the Predictions tab.
- Flexsee lists ranked products with confidence (High, Medium, Low) and labels such as Highly recommended — the signal Klaviyo Campaign Send uses for per-recipient blocks.
Use these tabs when merchandising or support wants to spot-check scores without reopening an active flow.
Which channel when?
| Goal | Wizard Flow destination | Recommendation shape |
|---|---|---|
| Email with personalized product blocks | Email & SMS (Klaviyo) | User → products per recipient via Flexsee Campaign Send |
| Retarget high-intent viewers of one SKU | Meta Ads | Product → users audience for that product |
| Promote a SKU via shoppable checkout link | Quick Pay | Product → users segment with checkout URL |
| Newsletter-style predictive segment | Mailchimp | Product → users scores exported through the wizard |
All paths share the same product_recommendations model Flexsee creates during Targeting.
FAQ
Do I need to train a model before Wizard Flow?
No. Wizard Flow creates and attaches a product_recommendations model during Targeting when one does not exist for your store. After activation, you can view the model on AI Models and Retrain Model when Flexsee recommends it — but training is not a separate prerequisite.
How is this different from Shopify related products?
Shopify related products are co-purchase rules on the storefront. Flexsee scores individual shoppers against individual SKUs using orders plus pixel events, then activates those lists in Meta, Klaviyo, Mailchimp, or Quick Pay — including per-recipient email product blocks.
What Shopify data does Flexsee use?
Products, orders, and customers sync via the Shopify app. Flexsee AI Predictions pixel events (page views, product views, cart, checkout) enrich the model. No CSV export is required.
Targeting stuck on “Creating model automatically”
Training time depends on catalog size and queue load. Leave the wizard open — it polls until the model completes, then moves to Generating audience. If it fails, check Readiness event count and order history on the Shopify integration page.
Can I run recommendations without sending a campaign?
Yes. Products → Audience and Customers → Predictions are useful for merchandising insights. Wizard Flow is how you activate the same scores in a channel.
Conclusion
AI product recommendations on Shopify in Flexsee start in Wizard Flow: sync Shopify, pass Readiness, choose a destination, pick a product on Targeting, and let Flexsee train the model and score your audience. Complete Destination setup, activate, and optionally validate the same intelligence on Products and Customers.
Next steps
- How to add AI product recommendations to Klaviyo — Flexsee Campaign Send flows and templates
- How to use Shopify ecommerce predictions in Flexsee (2026 guide) — extended walkthrough including troubleshooting
- Seed Meta lookalike audiences from Shopify behavior
- Connect Shopify and Flexsee in 10 minutes
Comments