How to connect Shopify and Flexsee in 10 minutes
Connect your Shopify store to Flexsee, sync catalog and orders, train your first prediction model, and start a Wizard Flow for email or Meta campaigns.
Most Shopify merchants want personalized recommendations and smarter ad audiences without standing up a data team first. Flexsee connects to your store, syncs products and orders, trains models on that history, and routes predictions into Wizard Flow for Klaviyo email or Meta Ads.
This guide is the fastest path from a new Flexsee account to a connected store, a trained model, and your first draft campaign flow. Plan about ten minutes for OAuth and sync; model training runs in the background and may take longer depending on catalog size.
What you’ll accomplish
- Shopify connected under Integrations → Datasources with products, orders, and customers syncing
- Flexsee AI Predictions pixel enabled so behavioral events count toward your first model
- A trained e-commerce prediction model built from synced Shopify data
- A Wizard Flow draft ready for Klaviyo, Meta Ads, or Quick Pay as your next activation step
Prerequisites
Before you begin, make sure you have:
- A Shopify store with products listed and some order history (more history improves early predictions)
- Shopify Admin access to install apps and approve OAuth scopes
- A Flexsee account — sign up free if you do not have one yet
You do not need Klaviyo or Meta connected for this setup guide. Add those integrations when you are ready to activate a specific Wizard Flow destination.
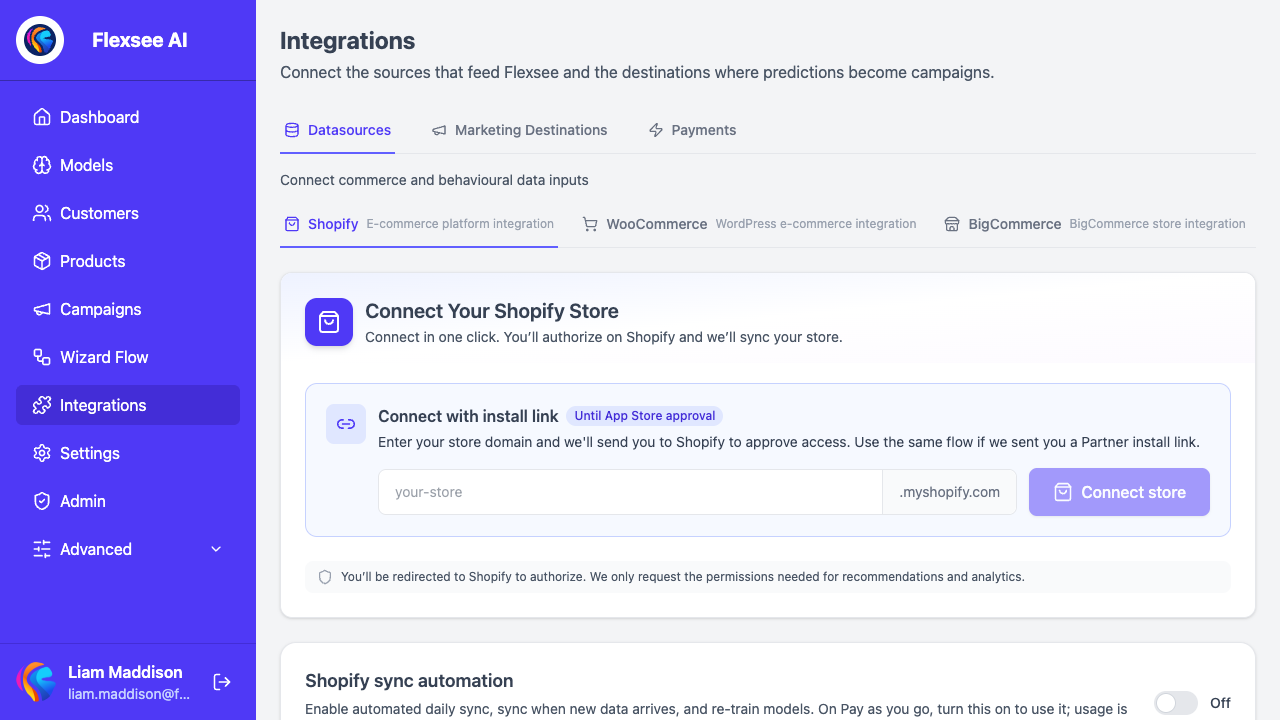
Step 1 — Connect Shopify in Flexsee
In this step, you will authorize Flexsee to read catalog, order, and customer data from your store.
- Sign in to the Flexsee dashboard.
- Open Integrations → Datasources → Shopify (
/integrations/datasources/shopify). - Choose your connection path:
- Install from Shopify (primary): click Install from Shopify, approve the app in Shopify Admin, then open Flexsee AI Predictions from your apps list. OAuth completes and sync starts automatically.
- Connect with install link: enter your store subdomain (for example
your-store) and click Connect store. Shopify opens for authorization; you return to Flexsee when approved. - If you already installed the app: use Connect installed store when Flexsee detects your
.myshopify.comdomain.
- Wait for the store card to move from Connecting or Syncing to Synced. The card shows live counts for Products, Orders, and Customers, plus Last Sync.
Flexsee runs the initial sync in the background after OAuth. Partial counts may appear while sync is in progress; the UI shows Sync in progress with per-resource totals when applicable.
Step 2 — Enable the pixel and confirm behavioral events
In this step, you will make sure Flexsee can collect storefront events for model training.
- On the same Shopify integration page, confirm Flexsee AI Predictions pixel status is connected. If not, click Enable pixel on the store card.
- In Shopify Admin, go to Settings → Customer events → App pixels, open Flexsee AI Predictions, and set Mode to Always on. Optimized modes can limit event data Flexsee needs for predictions.
- If you have no models yet, Flexsee shows Behavioral events (for first model) with a progress bar (10 minimum events). Browse your storefront (product views, add to cart) until the bar shows Ready to train.
The pixel and synced orders together feed the e-commerce training pipeline. Stores with only catalog data and no events may need a short burst of storefront traffic before training unlocks.
![]()
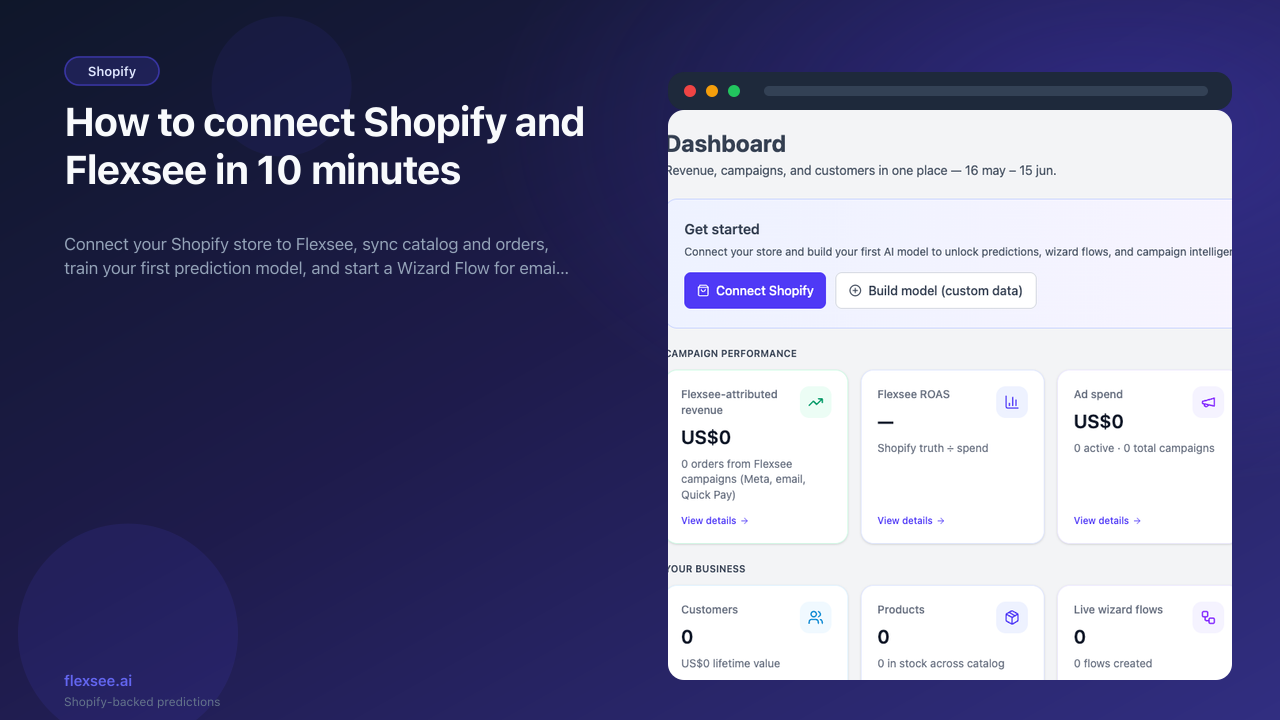
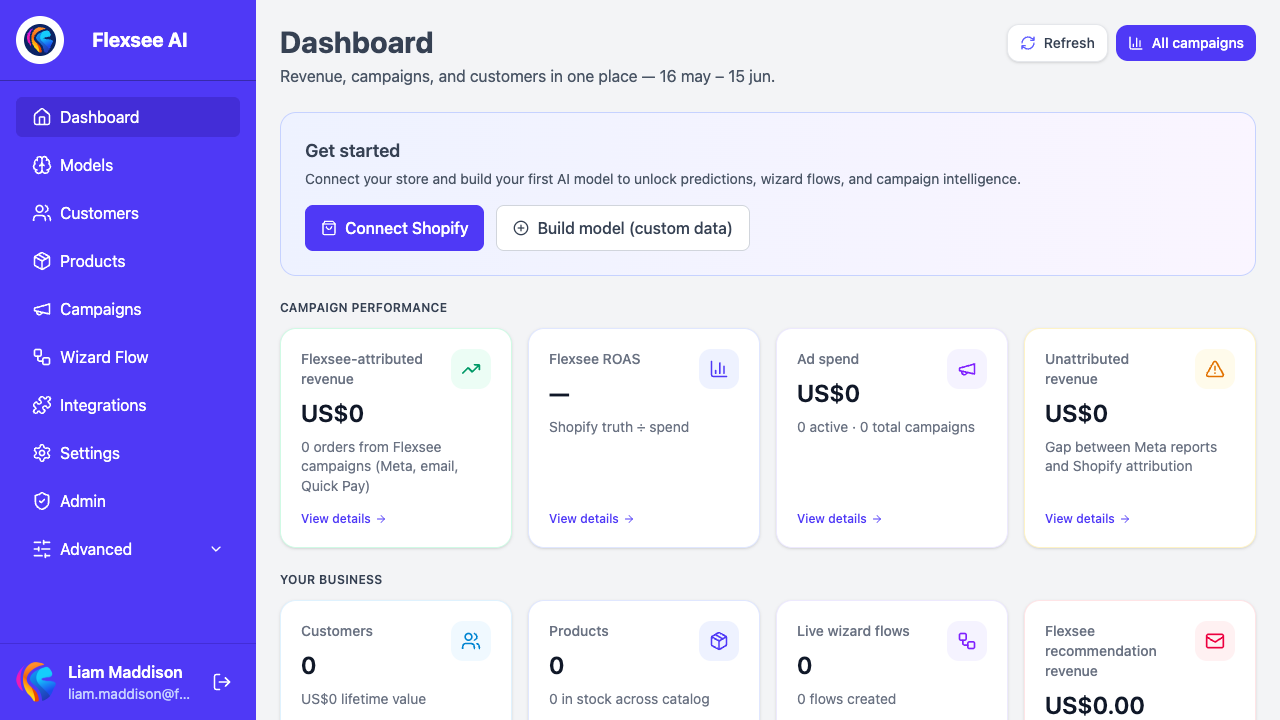
Step 3 — Review the dashboard
In this step, you will orient yourself in Flexsee before training.
- Open the Dashboard home (
/). - Scan high-level metrics once sync completes — revenue, campaign signals, and model readiness vary by plan and connected destinations.
- Use the sidebar to jump to Integrations, Models, Wizard Flow, and Campaigns as you add destinations later.
The dashboard is your hub after Shopify is connected. Campaign and attribution tiles become more useful once you connect Meta or send through Klaviyo.
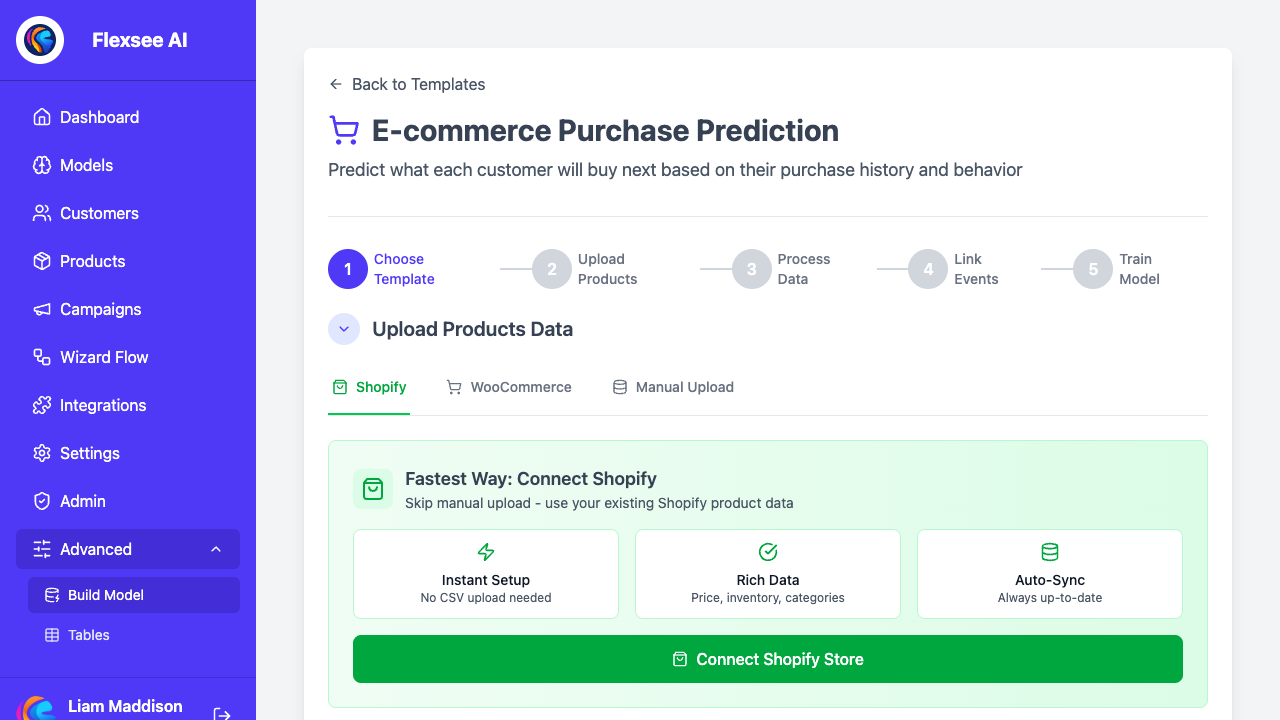
Step 4 — Train your first prediction model
In this step, you will turn synced Shopify data into a model Flexsee uses for recommendations and audience scoring.
- From the Shopify page, click Build Model when events are ready (or open Build Model from the main nav and choose the E-commerce template at
/build-model/ecommerce). - On Upload Products Data, select the Shopify tab. Flexsee lists connected stores — use synced product and order tables rather than uploading CSVs manually.
- Walk through Process Data and Link Events. For Shopify, Flexsee can link user_events from the pixel and purchase history from orders automatically on the Link Events step.
- Click Start AI Training with Shopify Data, then configure training on the Train Model step and submit.
- Open Models (
/models) and wait until your model status is Complete before relying on predictions in Wizard Flow.
Training time depends on row counts and queue load. You can leave the page; refresh Models to check status. Pro+ plans include automated daily sync and re-training; on Pay as you go, enable automation in Shopify integration settings — usage is deducted from your wallet.
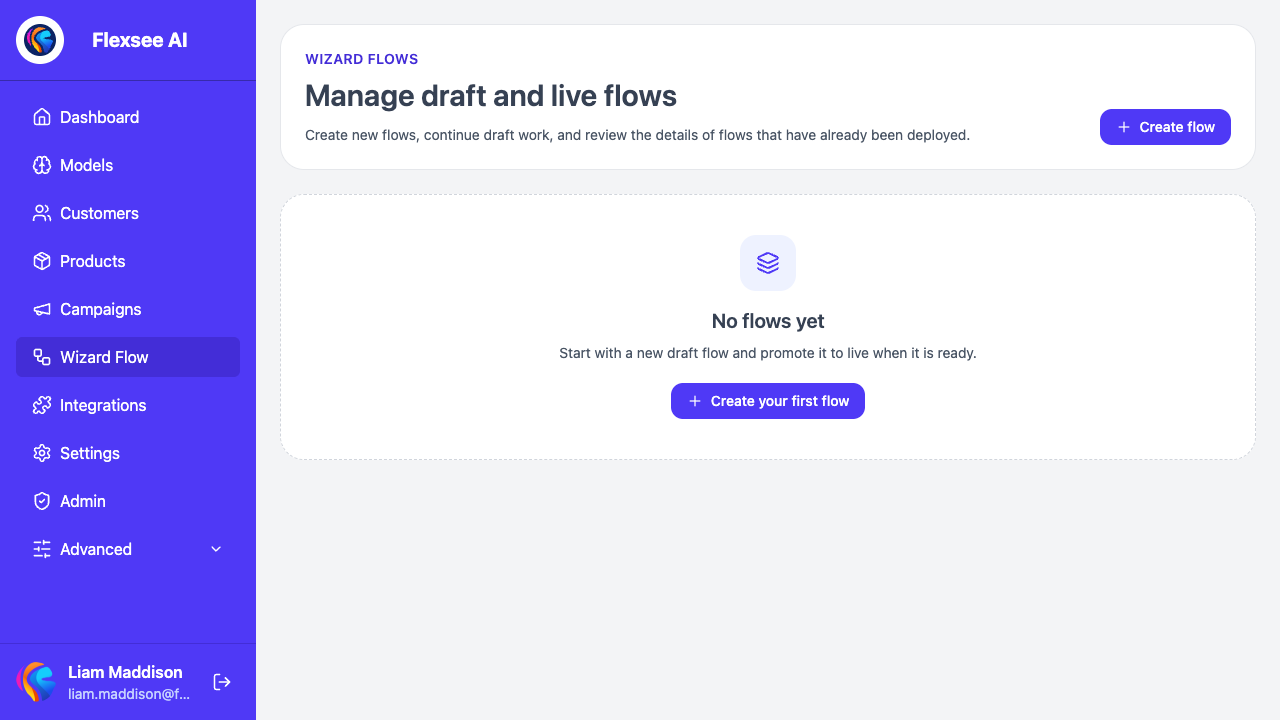
Step 5 — Start a Wizard Flow
In this step, you will create a guided campaign draft that uses your Shopify source and trained model.
- Open Wizard Flow (
/wizard-flow). - Click Create flow (or Create your first flow if the list is empty).
- On Data source, confirm Shopify is selected and passes readiness checks (connected store + trained model).
- Pick a Destination — Meta Ads, Email & SMS (Klaviyo), or Quick Pay depending on your next channel. Connect the destination under Integrations if the flow prompts you.
- Continue through audience selection and destination-specific setup. Save as a draft until you are ready to activate.
Wizard Flow is where Flexsee turns predictions into outbound actions: lookalike or retargeting audiences for Meta, Flexsee Campaign Send email through Klaviyo, or checkout offers via Quick Pay.
Troubleshooting
Store stuck on Connecting or Syncing
OAuth may have succeeded while sync is still running. Wait a few minutes and watch product/order counts climb. Click Sync Now on the store card to retry. If status shows Sync failed, read the error on the card and re-authorize with Re-connect if scopes changed.
Pixel shows disconnected
Click Enable pixel on the Shopify page, then confirm Always on in Shopify Customer events. Ad blockers and password-protected storefronts can delay event counts in development stores.
Build Model button disabled or training fails
Check Behavioral events reached 10 minimum and that products and orders synced (non-zero counts). Very new stores may need more orders or storefront sessions before training produces useful rankings.
Wizard Flow readiness blocks progress
Open the readiness step message — it usually points to a missing trained model, disconnected Shopify store, or destination integration. Fix the linked integration page first, then return to the flow.
Frequently asked questions
Do I need to upload CSV files if Shopify is connected?
No. The Shopify tab on the e-commerce build path uses tables Flexsee already synced. Manual upload remains available under other platform tabs if you run a hybrid stack.
How long does the first sync take?
Small catalogs often finish in minutes; large catalogs with deep order history can take longer. The UI updates counts incrementally — you do not need to keep the tab open.
Can I connect multiple Shopify stores?
Yes. Each store appears as its own card on the Shopify integration page with separate sync stats. Models and Wizard Flows are org-scoped — pick the store and model that match the campaign you are building.
What should I do after this setup?
Connect Email & SMS for Klaviyo or Meta Ads for paid social, then follow the dedicated guides for your destination. Flexsee Campaign Send and Meta lookalike flows assume the Shopify + model foundation you built here.
Conclusion
You connected Shopify, confirmed event collection, trained an e-commerce model, and opened Wizard Flow for your first campaign draft. That is the core Flexsee loop: sync → train → activate on owned channels with Shopify-backed attribution.
Comments