How to read a customer's journey and Quick Pay sessions in Flexsee
Open any customer profile to see pixel-tracked sessions, their outcomes, and the Quick Pay payment link behind each visit—no spreadsheets or exports.
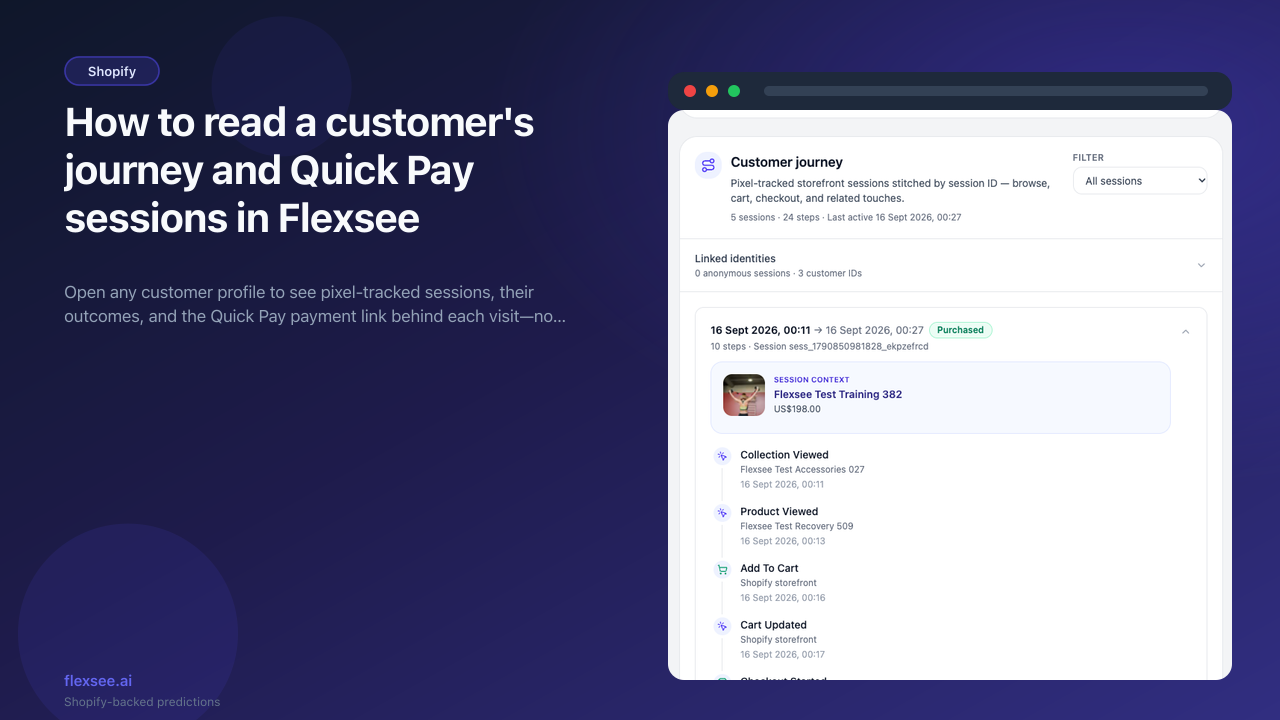
A dashboard can tell you how many sessions ended in a purchase. It cannot tell you what one customer actually did before they bought, or where they stopped. That is the gap the Customer journey section closes: it takes the events your storefront pixel records, groups them into sessions, and shows each session on the customer’s profile with a clear outcome.
This guide shows you how to open a profile, read each session from first page view to the last step, and use the session context card to see which product, and which Quick Pay payment link, a visit was about. You will need a Flexsee account with a connected store and the behavioral pixel running.
What you’ll accomplish
- Open a customer profile and find the Customer journey section
- Filter a customer’s sessions by outcome, such as Purchased or Checkout abandoned
- Read a session timeline from the first page view to the final checkout step
- Tell storefront sessions apart from Quick Pay Payment link sessions, and see the product behind each one
Prerequisites
Before you begin, make sure you have:
- A store connected under Integrations → Datasources with customers synced (see Shopify and Flexsee setup in 10 minutes)
- The Flexsee AI Predictions pixel enabled with Customer events → Always on (see Shopify behavioral pixel setup). The journey is built from pixel events, so no pixel means no sessions.
- Optional, for Payment link sessions: Quick Pay enabled through Stripe Connect, and a Campaign Flow that uses Flexsee Quick Pay as its checkout route. The Quick Pay and Stripe Connect docs walk through both.
You do not need to configure anything in the Customer journey section itself. It fills in as events arrive.
How Flexsee builds a session
Flexsee takes the storefront events from your pixel, plus the events from Quick Pay pages, and groups them by session ID. If there is a gap of more than 30 minutes between two events, the later events start a new session. Sessions are listed newest first.
Each session gets one outcome label, based on the furthest point the shopper reached:
| Outcome label | What it means |
|---|---|
| Purchased | The session includes a completed checkout |
| Checkout in progress | Checkout started but did not finish, and the last step is less than 24 hours old |
| Checkout abandoned | Checkout started but did not finish, and nothing has happened for 24 hours |
| Added to cart | The shopper added something to the cart but never started checkout |
| Browse session | Product or page views only |
| Activity | Events that do not fit any of the above |
The 24-hour wait matters. A shopper who left checkout ten minutes ago may still come back, so Flexsee holds off on calling it abandoned.
Step 1 — Open a customer profile
In this step, you will open a customer who has tracked sessions.
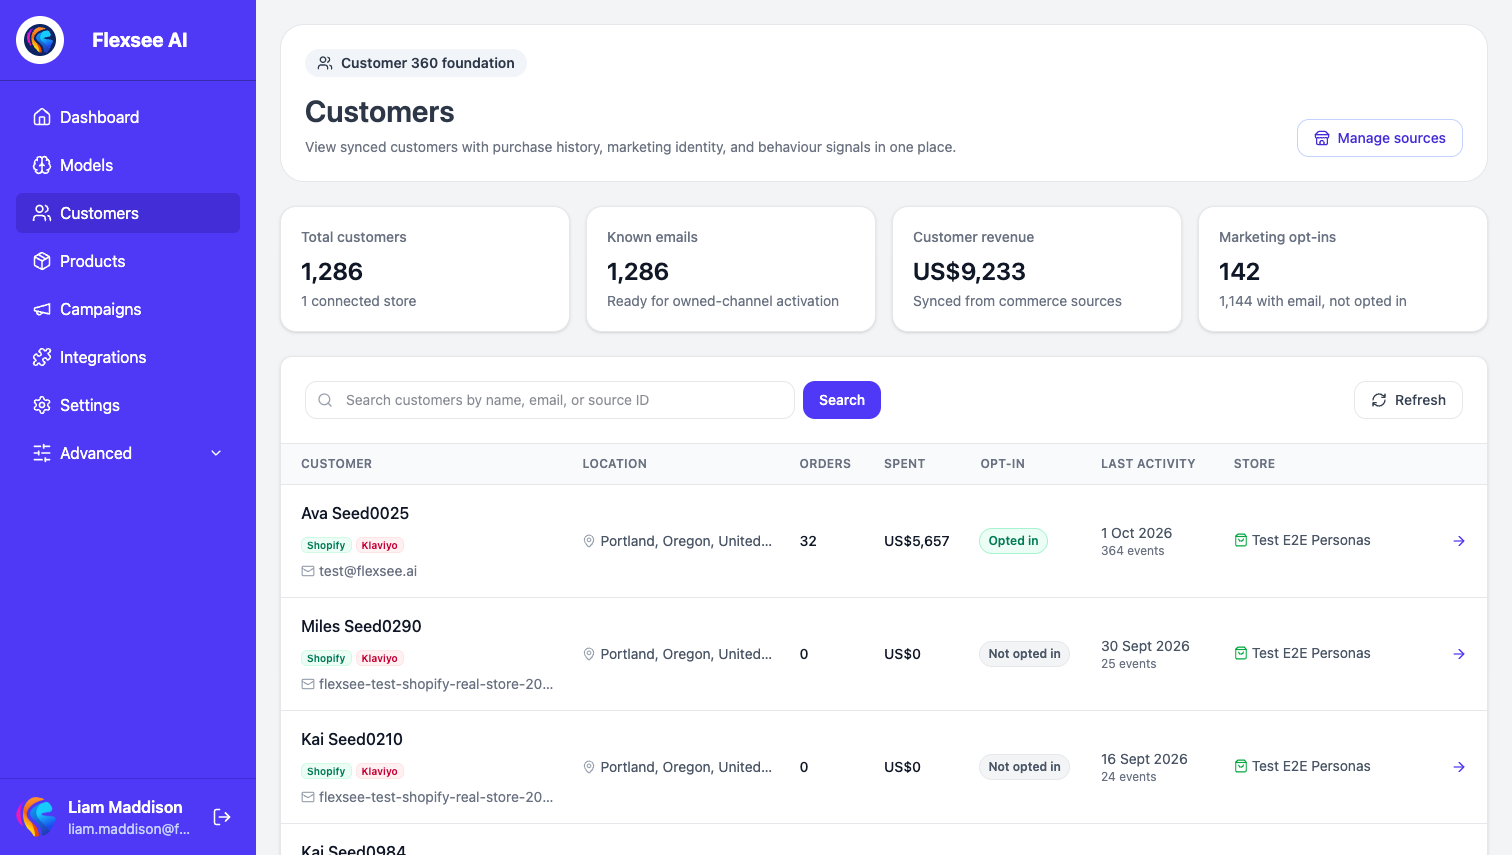
- Open Customers in the sidebar. The page lists your synced customers with orders, spend, opt-in status, and last activity.
- Search by name, email, or source ID, or scan the Last activity column for recent visitors.
- Click a row to open the profile.
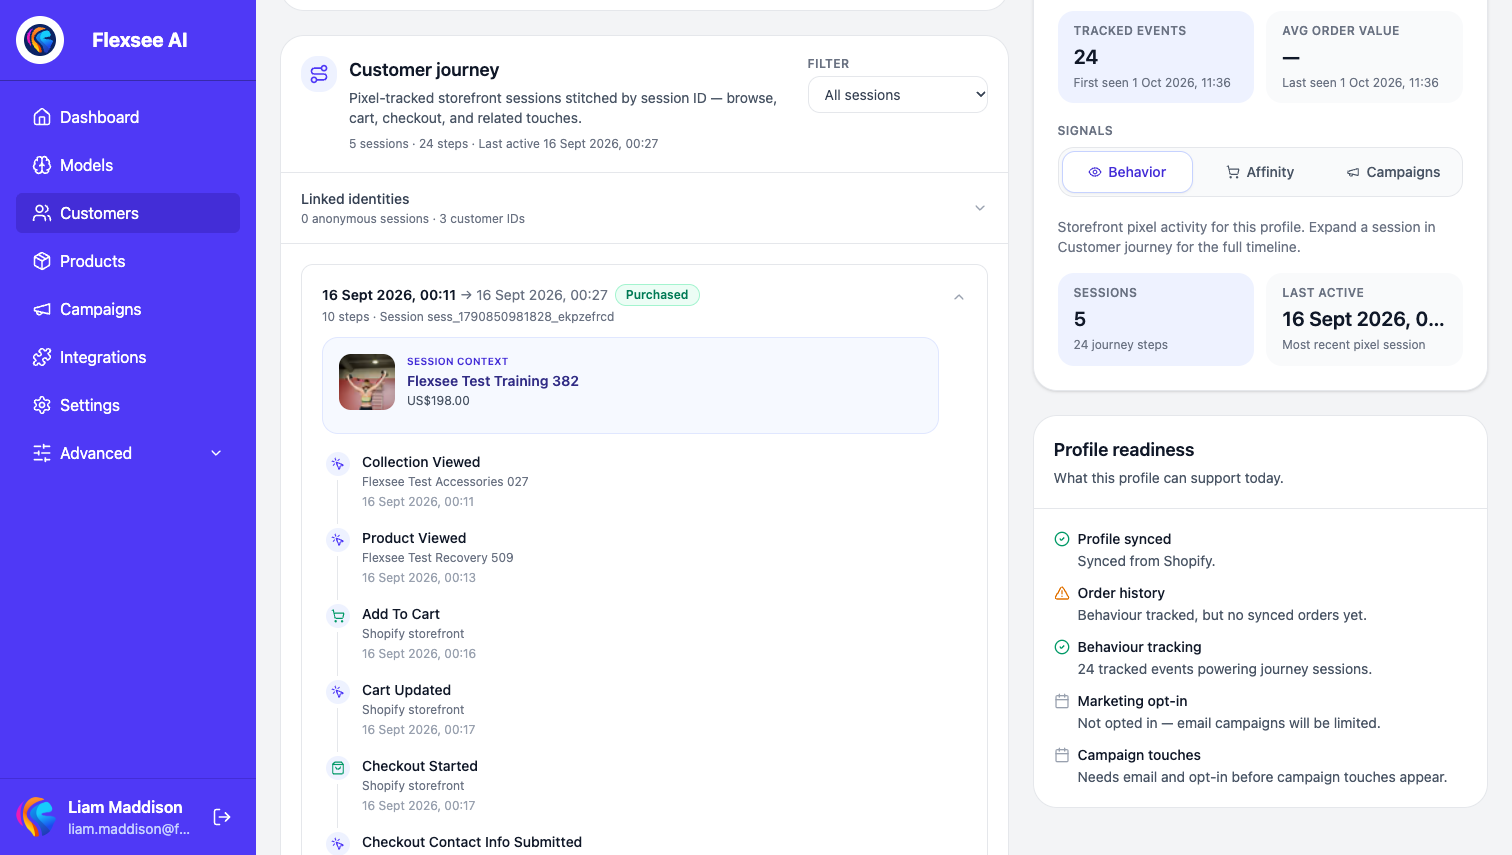
- Look at the Overview panel on the right. Under Signals → Behavior, the Sessions tile shows how many sessions and journey steps Flexsee has for this customer, and Last active shows the most recent pixel session.
Step 2 — Read the session summary and filter by outcome
In this step, you will find the Customer journey section and narrow it to the sessions you care about.
- Scroll the profile down to Customer journey. The summary line shows the number of sessions, the number of steps, and when the customer was last active.
- Open Linked identities to see how many anonymous sessions and customer IDs Flexsee has tied to this profile. This is how browsing under an anonymous session ID can end up on a named customer.
- Use the Filter menu to show only Purchased, Checkout in progress, Checkout abandoned, Added to cart, or Browse sessions.
- The list shows five sessions at a time. Choose Load 5 more sessions to reach older ones.
Filtering to Checkout abandoned is a quick way to see where a particular customer dropped out, which is useful context before you decide how to follow up.
Step 3 — Expand a session and read the timeline
In this step, you will read one session from its first event to its last.
- Click a session row to expand or collapse it. The first session is open by default. A collapsed row shows a one-line summary of its first four steps, followed by how many more there are.
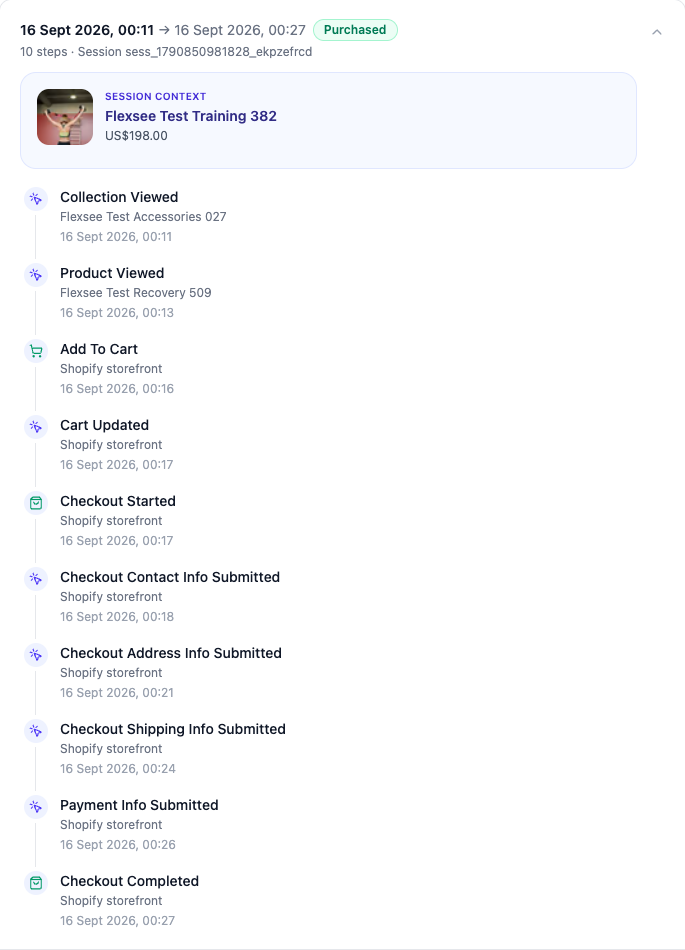
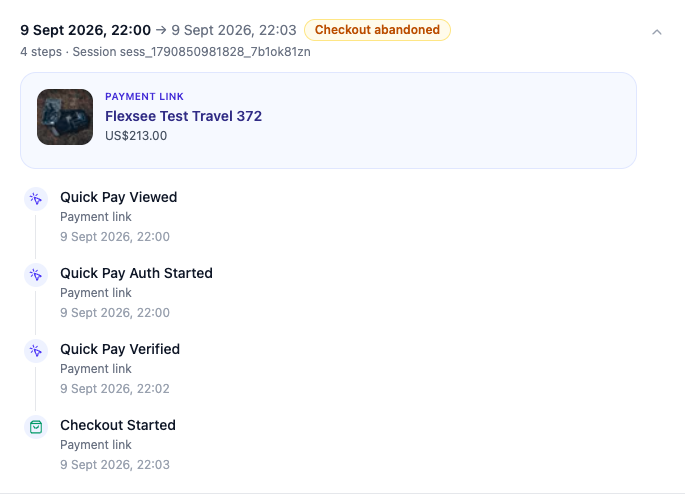
- Read the header: the start and end time, the outcome pill, the number of steps, and the session ID.
- Follow the steps from top to bottom. A typical purchase runs through Collection Viewed, Product Viewed, Add To Cart, Checkout Started, the checkout contact, address, and shipping steps, Payment Info Submitted, and Checkout Completed.
- Under each step title you will see the product or page it relates to, or the source (for example Shopify storefront), plus a timestamp.
Read the last step first when you are looking for friction. A session that ends at Checkout Started and then goes quiet is the one labelled Checkout abandoned. A session that ends at Checkout Completed is Purchased.
Step 4 — Read the session context card
In this step, you will see which product a session was about, and whether it came through a Quick Pay payment link.
- Look above the timeline for the highlighted card. A storefront session shows Session context. A session that included Quick Pay events shows Payment link.
- Check the product name, image, and price. The product name opens the product profile in Flexsee, and View on store opens it on your storefront.
- If the session is tied to a Campaign Flow, the card also links to that flow. For Payment link sessions it adds Open Quick Pay preview.
- In a Payment link session, each step carries the source Payment link. You will see Quick Pay milestones such as Quick Pay Viewed, Quick Pay Auth Started, and Quick Pay Verified, followed by the checkout steps. Each Quick Pay milestone appears once per payment link within a session, so repeated events do not pad the timeline.
Flexsee fills the card from the references recorded with the session’s events: the product, the Campaign Flow, or the Flexsee recommendation or campaign that sent the shopper. When none of those are recorded, such as for a plain browsing session, there is no card.
Step 5 — Turn what you see into a next action
In this step, you will use the journey to decide what to do next.
- Click the Campaign Flow link on a context card to review that flow, then open Campaigns to see how it performs against Shopify-attributed revenue. The campaigns and attribution docs explain the numbers.
- Click the product name to open its profile and review which shoppers Flexsee ranks as most likely to buy it.
- If several customers drop out at the same checkout step, build a warm audience of high-intent shoppers and bring them back with a Meta retargeting campaign from Campaign Flow.
The journey shows you what happened. Campaign Flow is where you act on it.
Troubleshooting
The section says “No tracked sessions yet”
Flexsee has no pixel sessions tied to this customer. Confirm the pixel is enabled with Customer events → Always on, that the customer has browsed since you turned it on, and that the customer has been identified with a session ID. The pixel setup guide covers the checks.
A session has no context card
Flexsee did not find a product, Campaign Flow, or recommendation reference on that session’s events. That is normal for a visit that did not come from one of your campaigns or Quick Pay links.
One visit shows up as two sessions
A gap of more than 30 minutes between events starts a new session. If a shopper left the tab open over lunch, the later activity appears as its own session.
A session says Purchased but the Orders list is empty
The journey shows what your pixel recorded. The Orders list on the profile comes from synced store orders. If they disagree, check that the store sync is healthy under Integrations → Datasources.
Frequently asked questions
What is a Quick Pay session?
Quick Pay is Flexsee’s hosted checkout page for Campaign Flow offers and payment links. Revenue goes to your own Stripe account through Stripe Connect. A Quick Pay session is a visit that includes events from that hosted page, and Flexsee labels those steps Payment link. The Quick Pay docs explain setup and commission.
Why does a recent checkout say “in progress” instead of “abandoned”?
Flexsee waits for 24 hours of inactivity before it labels a checkout as abandoned. Until then the session shows Checkout in progress, because the shopper may still return.
Does the journey include emails and ads?
The session timeline is built from storefront and Quick Pay events. Email and Meta touches attributed to the customer in the last 30 days appear separately, under Signals → Campaigns on the same profile, once the customer has an email address and has opted in.
Do I have to train a model to see any of this?
No. The Customer journey comes straight from your pixel events. You only open Campaign Flow when you want to act on what you find.
Conclusion
You can now open any customer profile, filter their sessions by outcome, read a session from the first view to the last step, and tell storefront visits apart from Quick Pay payment link visits. That is one customer’s story, in order, without exporting anything.
Use it before you build an audience, and again after you launch a campaign, to check that real shoppers behaved the way your numbers suggest.
Comments